DroneCAN ESC Setup
Configure your ESCs via ArduPilot's Mission Planner
Step-by-Step guide from initial setup to a full motor bench test

How to Configure an ESC with ArduPilot: A Step-by-Step Bench Testing Guide
Follow this step-by-step guide to get your motor up and running on the bench ArduPilot, configured via DroneCAN. This setup ensures a clean, conflict-free configuration, minimising common issues and allowing for safe bench-level testing of your motor setup.
Equipment Used in This Guide
- Mission Planner on Windows 11.
- CubePilot Cube Orange+
- ESC (Connected via CAN1 Port to Flight Computer)
- Power Supply (Connected to ESC)
- Test Motor (Connected to ESC)
Step 1: Reset ArduPilot Parameters
Start with a clean configuration to avoid legacy or conflicting parameters.
- Reset all flight controller parameters within Mission Planner
- Reboot the flight controller using ctrl+f > reboot pixhawk
Step 2: Set Frame Class and Type
Proper frame configuration ensures the correct mapping of motors and control logic.
- Open Config > Full Parameter List.
- Set FRAME_CLASS = 1 — this selects Quad.
- Set FRAME_TYPE = 1 — this selects the common "X" frame layout.
- Click Write Params.
- Reboot the flight controller after making these changes.
Step 3: Calibrate the Compass
- Navigate to Setup > Mandatory Hardware > Compass.
- Under Onboard Mag Calibration, click Start.
- Slowly rotate the flight controller through all axes (360°) to allow calibration to complete.
- Once complete, you will see MAG_CAL_SUCCESS displayed.
- Reboot the flight controller.
Step 4: Calibrate the Accelerometer
- Navigate to Setup > Mandatory Hardware > Accelerometer Calibration.
- Select Calibrate Accel and follow the on-screen prompts.
- Wait for Calibration successful.
- Reboot the flight controller.
Step 5: Disable the Hardware Safety Switch (For Bench Testing)
By default, some flight controllers require a hardware safety switch to enable motor output. For bench tests, we can disable this requirement:
- Navigate to Config > Full Parameter List.
- Set BRD_SAFETY_DEFLT = 0.
- Click Write Params.
- Reboot the flight controller.
Step 6: Resolve "RC Not Found" Errors
When testing without an RC receiver, suppress this error:
- Navigate to Config > Full Parameter List.
- Modify the ARMING_CHECK bitmask to disable RC input checks.
- Set ARMING_CHECK = 1047998 (this disables only the RC input check while retaining other safety checks).
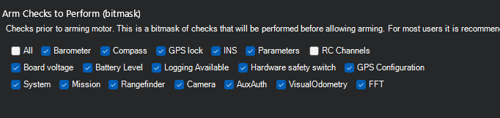
- Click Write Params.
- Reboot the flight controller.
Step 7: Enable DroneCAN Communication
Activate the CAN port to allow communication with the ESC:
- Navigate to Config > Full Parameter List.
- Set CAN_P1_DRIVER = 1 — this enables the CAN1 port.
- Click Write Params and reboot the flight controller to unlock additional CAN parameters.
Once rebooted:
If no additional parameters have been unlocked, click ‘Refresh Params’
- Verify CAN_D1_PROTOCOL = 1 (DroneCAN protocol enabled — usually default).
Step 8: Bench Testing
You have two options for bench testing: Hargrave Configurator or Mission Planner’s Motor Test.
Option A: Using Hargrave Configurator
- Set CAN_D1_UC_ESC_BM = 0 — This disables ArduPilot control, allowing the configurator to send commands directly.
- Disconnect your Flight Computer from Mission Planner.
- Connect to the Flight Computer’s MAVlink Virtual Port using the Hargrave Technologies Configurator Tool, by selecting the ‘Connect A DroneCAN Network’ (https://configurator.hargravetechnologies.com/)
- Navigate to the Control Page.
- Enable Drive when ready to test your setup.
- Adjust throttle sliders to test motor output.
Option B: Using Mission Planner Motor Test
- Set CAN_D1_UC_ESC_BM = 15 — This enables motors 1-4 for DroneCAN control. Use the bitmask selection tool in Mission Planner for convenience.
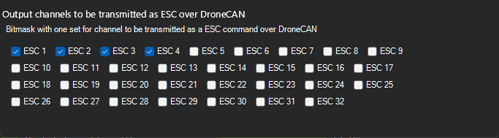
- Click Write Params.
- Navigate to Setup > Optional Hardware > Motor Test.
- Set desired Throttle % and Test Duration.
- To spin all motors, rapidly press;
- “Test All Motors” → “Stop All Motors” → “Test All Motors”